Tutorial on How To Create Your Own Personal Config File For Http Injector
How To Create Your Own Personal Config File For Http Injector
Now that we have Http Injector and it has a config file, one day the proxy and port inside the config file can stop working or reduce speed, so we decide to show you how to create your own personal config file for http injector with your own favorite Ip and Port without waiting for someone to upload new config file.

Creating config file for Http Injector is very simple and you don't need any additional to create the config file, all you need is the Http Injector app. Now follow the steps below to create your own personal and fastest config file for Http Injector now
How to Create Config File for Http Injector
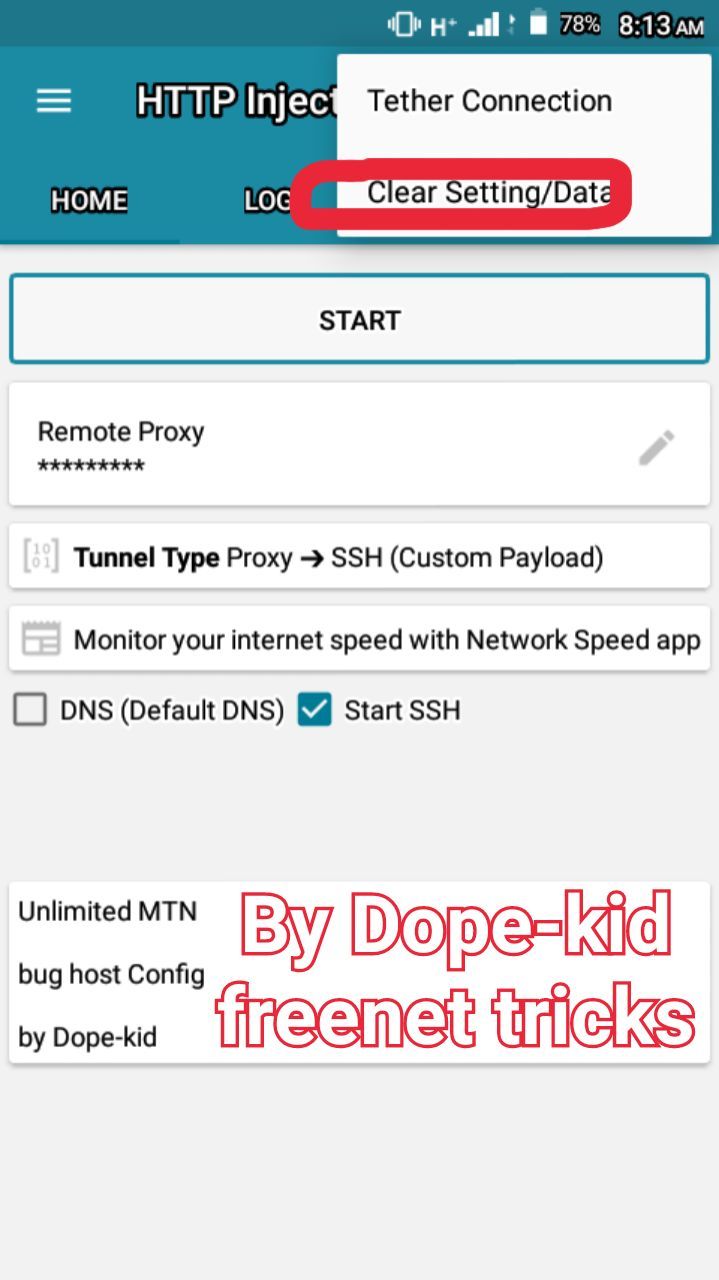
STEP 1: Launch the Http Injector app and go to right Menu and click on Clear Setting/Data, so that the entire existing Config file will be removed
 STEP 2: Go to left Menu and Click on Payload Generator
 STEP 3: Now under Payload generator, Input the following details
Url/Host: i9.ytimg.com
Request method: Connect
Injection Method: Normal
Tick Box: Online Host
Tick Box: keep alive
Tick Box: User agent
Then Click on Generate Payload
 STEP 4: After Payload is successfully Created, Go back to your http injector app home
Then Input your remote Proxy -ip:198.211.125.30 Port:8080
Then Tick the Start SSH box
 STEP 5: Now you need to Input your SSH Server Login details, At the left Menu click on SSH Setting and select your Connect Mode, SSH Host, SSH Port, Username and your Password. As shown below
 STEP 6: Now you can START your Http Injector and enjoy your personal config file

That's all folks
Click Here To Watch our YouTube Tutorial On How To Create Your Own Personal Config File For Http Injector
How to Create Config File for Http Injector
STEP 1: Launch the Http Injector app and go to right Menu and click on Clear Setting/Data, so that the entire existing Config file will be removed

Url/Host: i9.ytimg.com
Request method: Connect
Injection Method: Normal
Tick Box: Online Host
Tick Box: keep alive
Tick Box: User agent
Then Click on Generate Payload

Then Input your remote Proxy -ip:198.211.125.30 Port:8080
Then Tick the Start SSH box


That's all folks
Click Here To Watch our YouTube Tutorial On How To Create Your Own Personal Config File For Http Injector


Anx
ReplyDeleteJoh joh dopekid what you doing man
ReplyDeleteThanks bro your making it so easy one can download SSH from the play store.
ReplyDeleteWhat is the password
ReplyDelete